Height Adjustable Tapeboard


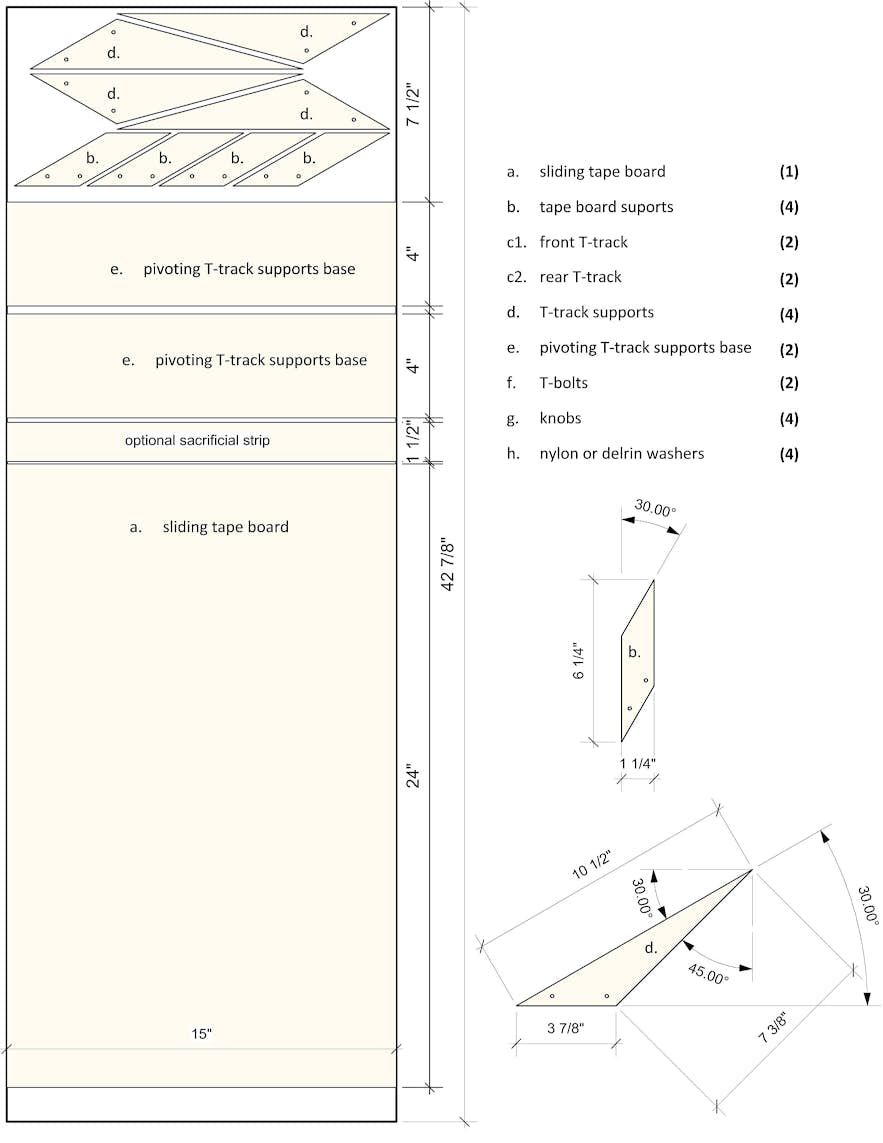
The HAT is a portable tapeboard that is adjustable from 3/4" to 6" in horizontal mode and to about 36" (height of your work bench)in vertical mode. The height adjustment is very quick and easy, and this rig will save a lot of time if you use a tapeboard on work of different thicknesses. Discussion of this system in this thread: https://community.shapertools.com/t/adjustable-height-self-aligning-tape-board-prototype/2068/20?u=brianj
77
Jigs & Fixtures
Files Included (3)
H A Tapeboard cutting plan.pdf
34 kBTapeboard 3 assembly.pdf
81 kBTapeboard parts.svg
2 kB
Materials
(1) piece of good quality plywood 15" x 44". Baltic or Appleply recommended. The example was built out of prefinished Appleply.
48" of T-track.
(4) T-bolts
(4) knobs
https://www.shapertools.com/hub/creators/59d26925735c740010ba2896/shares/5c2134252800470017e9416c
(4) washers, nylon or delrin prefered.
Tools
Optimum is a table saw. If not available, a track saw.
Alternatively, a Shaper Origin.
Drill of some type.
A miter or chop saw can be used if available and desired.
Instructions
1. Download and print the Cutting Plan pdf file, which is also shown as an image in the gallery. 2. Cut the (1) large 'a' and the (2) smaller 'e' rectangles. 3. There are (4) each of the two different parts 'b' and 'd'. I use a table saw, a miter gauge with a stop, and a known square block to flip the part on the miter gauge 90 degrees (there is a image of this). If you prefer using a miter/chop saw and the part 'd' exceeds the capacity of your saw, consider eliminating the point and just leave it truncated at about the area where the 'd' label sits, and cantilever the T-track out beyond the part. There's no downside to this method. In case cutting out the parts 'b' and 'd' with the Origin is preferred, the svg files are included. 4. Cut the T-track into (4) pieces ~ 12" long. In the images they are 11 1/8" long in the front, 10 1/2" in the back. This will provide about 6" of lift. The T-tracks can be cut to the same lengths, but it's hard to guide all four T-bolts into the T-track at the same time. Leaving the back tracks shorter means the rear T-bolts can be turned sideways and rested on the top of the track while you slide the front T-bolts in. Then the front T-bolts can be locked in place while the rear bolts are guided into their tracks. 5. Download and print the Tapeboard 3 assembly pdf. The two key points are to leave 5" at the front so that Origin doesn't hit the supports when working at the left and right ends, and to install the rear 'd' supports last, while everything is in place and tightened up snug. That helps to align all the parts. The above is for the basic device which is used alone most of the time, there are some accessories for holding work vertically and supporting the Origin when working close to the near edge. I will add those at a later date.


